Giving Thanks

Do I still have a giant infection on my face? Yes. Does it look more gnarly as each day goes by? Yes! But guess what? I’m thankful. Here’s what I’m thankful for:

  • Doctors that make sure I’m getting the care I need
  • My parents and in-laws for stepping in and helping when I’m not feeling well
  • A house with a heater/insulation/furniture/hot water
  • Family that wants to be part of my life
  • Friends that check in with me
  • The resources to give music education to everyone! 😉

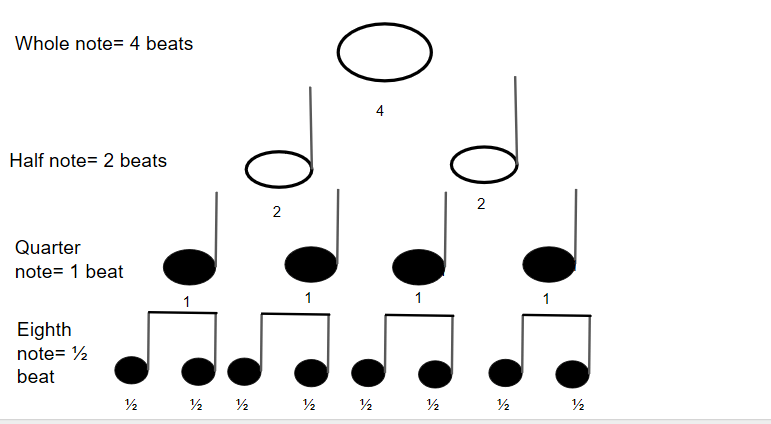
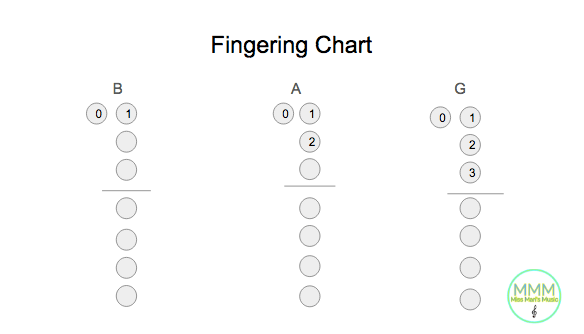
This week’s episode will help reinforce the fingering for G, A, B, C, and D by learning a classic holiday song- Jingle Bells! There are some skipping motions that will require extra practice, but this would be a great song to learn and perform for family and friends during the holidays!

A little side note- if you are a music teacher, I know this time of the year is INSANE! You are probably running around like crazy getting ready for holiday programs while trying to avoid all the germs spreading at school! If you find yourself (or your voice) needing a break, this is a great video that will teach a fun holiday song (maybe a bonus holiday belt for recorder karate?) while reinforcing music literacy. If you’re concerned about using YouTube, I recommend SafeShare where you can generate a link that doesn’t have all the video suggestions pop up at the end of the video or on the side bars. My videos are ad-free, but I know it is hard to control what YouTube suggests, and SafeShare is a great solution to that issue.

I’ll be off next week for Thanksgiving, but have a wonderful time with family and friends and enjoy the lesson!
Snapshot_28


The Thmb-less D!

For the first time in Miss Mari’s Music history, for Recorder Lesson 9, you are not using your THUMB!

Snapshot_24

Right? Unbelievable! Do you know what else is unbelievable? I’m still sick. In fact, it has actually gotten worse, and now I have an infection on my FACE! Lol. But what can you do? Life goes on, but this week’s lesson is much shorter than our normal ones. We will cover the fingering for fourth line D, then practice the transition from D to C. I hope you enjoy this short but sweet lesson! Keep on playing!

Taking the week off!

cold winter tablet hot
Photo by Pixabay on Pexels.com

Although I did film an episode for this week, I’ve decided to take a week off in order to recover from some sickness that has taken over the past couple of weeks. The time I usually spend editing videos and making visuals has been spent instead on the couch with lots of Kleenex and chicken soup! I’ll see you all next week for a lesson on our new note, D!

Creativity with Recorder

This week’s lesson is radically different! Instead of the typical dynamic where the student repeats after me, this week the student gets to decide what to play!

I remember the first time a teacher told me to improvise on a marimba. I was in a class with my peers, and I remember my body freezing. After years of playing exactly what a teacher told me to play, I thought I had no idea how to make up music on my own. I remember looking at the teacher thinking, “tell me what to do!” I wish the teacher told me that I had a HUGE toolbox to choose from! All those years of playing different styles of music on the piano in all the different key signatures had given me a wealth of vocabulary to improvise, but I had no idea I had it.

As an educator, I wonder what would happen if we started improvisation and composition much earlier than I did. What if we started it a few weeks into learning an instrument? I thought it would be interesting to teach improvisation and composition at an early stage in our learning because of the absence of choices; only four pitches and just a few note lengths to choose from. Maybe if we are given less choices, it isn’t as difficult to make one. If I went to an ice cream shop with fifty flavors of ice cream, it will be much more difficult than if they had five!

As a side note to my fellow music teachers, this week’s lesson was formatted for teachers either to use as a guide in teaching improvisation and composition, or to even use as sub plans if you would like an alternative to showing the educational music DVDs ;-). I have a PowerPoint presentation available for download here if you would like to save yourself a little time with lesson planning as well!

Don’t forget to post any questions or comments, and enjoy the lesson!
Snapshot_12

Brrr!

Maybe it is just in this part of the country, but it went from shorts and flip-flops on Sunday to Uggs and scarves on Monday! This week’s lesson features a song called Falling Leaves. The song uses skipping motion from third space C, with notes skipping first between C and A, then C and G. I thought of falling leaves because it reminds me of the way leaves fall from trees. Most of the time, they detach as wind is blowing, so they make their way to the ground via swirls up and down with the wind.

… But we don’t have that in Texas. In fact, even though the high has been in the 40s the past couple of days, the tree in my front yard is still full of green leaves! Go figure! Anyways…

If you have been patiently taking the lessons each week, I commend you! For the sake of being real, I feel compelled to emphasize a few things as we go through our music making journey-

  1. It is ok to pause, rewind, or even re-watch the episodes. While these videos are a great way to provide music education to everyone, I fully understand that these lessons are not going to be as individualized as having a live teacher with you. Here’s why. I’m sequencing these lessons based on my time in a classroom with 30+ students and their individual needs. This just means I’m trying not to go too fast, but also not too slow. HERE’S THE DEAL- in that class with 30+ kids, there are going to be 30+ different perspectives, learning styles, preferences, personalities, etc. I have basically taken the most common denominators between a class full of students and attempted to make a video that suits MOST people’s ability level. In a real classroom, the video lessons would take up the entire 50 minutes because I would be fixing each student’s mistakes individually. My former students could probably attest to the fact that a lot of times we wouldn’t even finish in 50 minutes because of the individual time I needed with each student. My point is, don’t beat yourself up if you need to pause, take a breather, re-watch, etc. This is normal and honestly I would assume 95% of true beginners watching this would need extra practice, especially when we start reading music.
  2. Ask questions in the comments! Really! Don’t be shy! I know there are people watching these lessons, and nobody has asked a question yet! If you ask a question about something I have already answered in a previous lesson, guess what? It’s totally fine because I’m covering a lot of information in these lessons! I won’t be mad, and even if I was, what can I do about it? I’m trapped behind a screen so I can’t get you 😉
  3. Have fun. Don’t take yourself too seriously, really. For what it’s worth, here is a picture of me with some “real” percussion instruments, but also with toddler instruments because they actually sound pretty decent and I thought they would be a great accompaniment for this week’s song! Maybe someone might scoff at me using Melissa and Doug Band-In-A Box instruments for a music education video, but you know what… they aren’t the ones who get to have all the fun playing them! 🙂

Picture 14


The Funky C!

Ok, so the note itself isn’t necessary full of soul and makes you want to dance… but the way your fingers maneuver to get to the proper hand position may remind you of someone attempting the funky chicken!

But really, learning the finger position for third space C is the beginning of weird recorder fingerings! What makes it unusual is the fact that, until now, you have always used 0 (left thumb) and 1 (left index finger) to play B, A, and G. All of a sudden, with C, you still use your thumb, 0, but you don’t use your index finger, 1!
Snapshot_5

Have no fear! In lesson 6, we will get lots of practice playing C correctly, in addition to transitioning from C to B, which takes a little coordination. Pretty soon you’ll be switching from C to B in your sleep :-).

Third Line C

If you want free hard copies of the music we will be learning, check out my Teacher’s Pay Teachers store where you can download and print the songs for free!

Don’t forget to either comment on the video or here with any questions you have!


Elevators and Skipping

Recorder Lesson 5 is up! This week we are working on skipping motion, which means the notes played must skip another note on the staff to get to the desired note. In other words, going from G to B, skipping over A! Skipping motion requires more finger coordination, so a lot of the lesson is training your muscles to move the way you need them to! We also go over some new note lengths- half notes and whole notes. Half notes are two beats long, and whole notes are four beats long. In previous lessons, we worked on quarter notes, which are one beat long, and eighth notes, which are half a beat long.

Guess what? If you check out my Teachers Pay Teachers Store, you can download the visuals from the lesson for free! These are great to print off and post on a wall or bulletin board for visual reminders of note lengths. Here is one of the visuals that I love:

Rhythm Chart 1

I hope you enjoy my silly songs I composed this week, Elevator Jam! and Skippety Skip! I had a lot of fun making the accompaniment, as you can probably tell :-). Enjoy the lesson, and post any questions in the comments!

Picture 6


Ac-com-pa-ni-ment

Accompaniment! What is it, and why learn about it in Lesson 4? If you Google the definition of accompaniment, it is defined as a musical part that supports or partners a solo, voice, or group. Accompaniment is simply something fun to add to the recorder to make it fun and interesting! Aside from making it fun and adding depth to music, it also helps us make sure we are playing to a steady beat since we are collaborating with another musician or musical track.

The other part of our lesson focuses on tonguing. Tonguing is the interruption of airflow with, you guessed it- your tongue! Tonguing helps distinguish notes while keeping a consistent, clear tone quality. While this may sound like some sort of crazy magic trick that requires crazy coordination, you might be surprised to learn that you tongue all the time! Think about it- when you talk, what would happen if you didn’t have your tongue? You could probably still get the words out… but nobody would understand you!

This week’s lesson is fun because we are working on techniques and concepts that help create beautiful music. Accompaniment isn’t necessary ALL the time, but it can add wonderful depth to an instrument that is playing a beautiful melody, in our case the Ba-Ba Song and Hot Cross Buns!


G A B in Lesson 3!

I hope you have been practicing! For lesson 3, we are learning the proper fingering for G, practicing moving our fingers between G, A, and B, and reading G, A and B on the music staff! As you add more notes, it is important to really train your muscles in your fingers to move the way you need them to! On my Teachers Pay Teachers page, you can find the free downloadable resources for lesson 3. I will eventually go over this in my videos, but something I added this week was a fingering chart. A fingering chart is simply a visual aide you can print and hang on your wall to help you remember the proper fingerings for each of the notes. As we learn more notes, I will update the fingering charts with the most up to date notes. Below is what this week’s fingering chart looks like. The single circle on the left of each note represents the hole on the back of the recorder, and the row of holes on the right represent the holes on the front of the recorder. The horizontal line separates right hand and left hand. The left hand covers the holes ABOVE the horizontal line, and the right hand covers holes BELOW the line. The numbers represent the number labels we have given our fingers (ex. thumb= 0, index finger= 1, etc.).

Screen Shot 2018-09-18 at 9.39.49 PM

Some tips for lesson 3!

  • As you begin to cover more holes, it is going to be easier to blow too fast and squeak! Be sure not to blow too fast!
  • When you learn Hot Cross Buns, it will help to rewind and practice along with the video a few times.
  • When the camera is on the music staff and you are playing, there will be times where you can distinctly see what holes my fingers are covering on the recorder, and other times where you can’t see my recorder at all. This has a purpose! My goal is for the student to be able to READ the notes on the staff instead of copying my fingers. I understand there are times where the student might want to get a visual reinforcement and make sure they are covering the correct holes, but the BEST way to know whether or not they are covering the correct holes is to listen with their ears and hear whether or not their pitch matches mine. If the pitch doesn’t match, from there you reassess whether it is a fingering issue or a blowing issue.
  • HAVE FUN!

This lesson will be a blast! Don’t forget to post any questions you have in the comments!

BA-BA Recorder!

Why BA-BA? No, I’m not talking about sheep! For lesson 2, we will be working on B and A. BA! When we start adding in additional notes besides B, in this case A, there is time that needs to be committed to switching between B and A in order to train our fingers and develop muscle memory. Hence BA-BA!

In lesson 1, we learned…

  • left hand on TOP!
  • Hold the recorder at a 45 degree angle
  • We label the thumb as 0, index finger as 1, middle finger as 2, ring finger as 3
  • To properly blow, imagine cooling off soup on a spoon. You don’t want to blow too hard and make the soup splash everywhere, but you also don’t want to blow too weak and still have burning hot soup. Whisper “too,” but don’t use your voice!
  • The pitch B uses 0 and 1, with 0 covering the back hole and 1 covering the front.
  • The two most common mistakes with a squeaky sound on the recorder are overblowing and not covering the holes completely with the pads of your fingers.

We also practiced call and response patterns between you and me. I changed the rhythm, or duration of each note, a few times while you played along.

In lesson 2, we will learn and demonstrate…

  • Fingering for A
  • Call and response patterns for A
  • Identifying A on the music staff
  • The difference between lines and spaces on the music staff
  • How to identify the lines and spaces on the music staff
  • Practice reading B and A on the music staff
  • Learn our first song- The Ba-ba Song!

As mentioned in the video, for next week’s homework, you are practicing parts 2-6. This includes the playing exercises we read from the staff. For your convenience, you can download the exercises and Ba-Ba song from my store at Teachers Pay Teachers. FOR FREE!Just a heads up, for now the exercises are literally photos from the video, but eventually I will get future lessons up as formal sheet music. Still working out some technical kinks! Downloading the sheet music is not necessary by any means, but it might make it easier to practice without having to be close to an internet connection for your entire practice session. It’s up to you! A little pause and rewind aren’t so bad if you don’t want to buy anything, either.

ENJOY and have fun on Lesson 2, and remember to post any questions you may have in the comments section either here or on YouTube!